User Manual
Instantiate a Ribbon Bar
RibbonBar is inherited from QMenuBar,
you can use the setMenuBar method of QMainWindow to set the ribbon bar as the main menu bar.
from pyqtribbon import RibbonBar

window = QtWidgets.QMainWindow()
ribbon = RibbonBar()
window.setMenuBar(ribbon)
Example
For example, using the following code,
import sys

from qtpy import QtGui, QtWidgets

from pyqtribbon import RibbonBar
from pyqtribbon.screenshotwindow import RibbonScreenShotWindow

if __name__ == "__main__":
    app = QtWidgets.QApplication(sys.argv)
    app.setFont(QtGui.QFont("Times New Roman", 8))
    window = RibbonScreenShotWindow("ribbonbar.png")

    # Ribbon bar
    ribbonbar = RibbonBar()
    window.setMenuBar(ribbonbar)

    # Show the window
    window.resize(1000, 250)
    window.show()

    sys.exit(app.exec_())
You can get a window like this:

Customize Ribbon Bar
General Setups
|
Set the style of the ribbon. |
Get the total height of the ribbon. |
|
|
Set the total height of the ribbon. |
Show the ribbon. |
|
Hide the ribbon. |
|
Get the visibility of the ribbon. |
|
|
Set the visibility of the ribbon. |
Setup Title
Return the title of the ribbon. |
|
|
Set the title of the ribbon. |
|
Add a widget to the title widget. |
|
Insert a widget to the title widget. |
|
Remove a widget from the title widget. |
Setup Category Tab Bar
Return the tab bar of the ribbon. |
Setup Quick Access Bar
Return the quick access toolbar of the ribbon. |
|
|
Add a button to the quick access bar. |
Set the height of the quick access buttons. |
Setup Right Tool Bar
Return the right toolbar of the ribbon. |
|
|
Add a widget to the right button bar. |
|
Set the height of the right buttons. |
Set the icon of the help button. |
|
Remove the help button from the ribbon. |
|
Signal, the help button was clicked. |
|
Return the collapse ribbon button. |
|
Set the icon of the min button. |
|
Remove the min button from the ribbon. |
Example
For example, using the following code,
import sys

from qtpy import QtGui
from qtpy.QtWidgets import QApplication, QToolButton

from pyqtribbon import RibbonBar
from pyqtribbon.screenshotwindow import RibbonScreenShotWindow

if __name__ == "__main__":
    app = QApplication(sys.argv)
    app.setFont(QtGui.QFont("Times New Roman", 8))
    window = RibbonScreenShotWindow("ribbonbar-customize.png")

    # Ribbon bar
    ribbonbar = RibbonBar()
    window.setMenuBar(ribbonbar)

    # Title of the ribbon
    ribbonbar.setTitle("This is my custom title")

    # Quick Access Bar
    qbutton = QToolButton()
    qbutton.setText("Quick Button")
    ribbonbar.addQuickAccessButton(qbutton)

    # Right toolbar
    rbutton = QToolButton()
    rbutton.setText("Right Button")
    ribbonbar.addRightToolButton(rbutton)

    # Show the window
    window.resize(1000, 250)
    window.show()

    sys.exit(app.exec_())
You can get a window like this:

Manage Categories
Return a list of categories of the ribbon. |
|
|
Add a new category to the ribbon. |
Add categories from a dict. |
|
|
Add a new category to the ribbon. |
|
Add a new context category to the ribbon. |
|
Add a group of context categories with the same tab color to the ribbon. |
|
Show the given category or categories, if it is not a context category, nothing happens. |
|
Hide the given category or categories, if it is not a context category, nothing happens. |
|
Remove a category from the ribbon. |
|
Set the current category. |
Return the current category. |
|
Show category by tab index |
Customize Categories
Setup Styles
Return the button style of the category. |
|
Set the button style of the category. |
Manage Panels
|
Add a new panel to the category. |
Add panels from a dictionary. |
|
|
Remove a panel from the category. |
|
Remove and return a panel from the category. |
|
Return a panel from the category. |
Return all panels in the category. |
Example
For example, using the following code,
import sys
from qtpy import QtGui
from qtpy.QtGui import QIcon
from qtpy.QtWidgets import QApplication
from pyqtribbon import RibbonBar, RibbonCategoryStyle
from pyqtribbon.screenshotwindow import RibbonScreenShotWindow
if __name__ == "__main__":
app = QApplication(sys.argv)
app.setFont(QtGui.QFont("Times New Roman", 8))
window = RibbonScreenShotWindow("category.png")
# Ribbon bar
ribbonbar = RibbonBar()
window.setMenuBar(ribbonbar)
# Categories
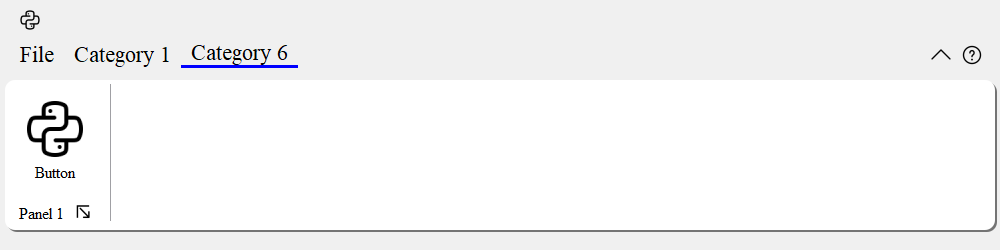
category1 = ribbonbar.addCategory("Category 1")
panel1 = category1.addPanel("Panel 1")
panel1.addLargeButton("Large Button 1", QIcon("python.png"))
category2 = ribbonbar.addContextCategory("Category 2")
panel12 = category2.addPanel("Panel 2")
panel12.addLargeButton("Large Button 2", QIcon("python.png"))
categories = ribbonbar.addCategoriesBy(
{
"Category 6": {
"style": RibbonCategoryStyle.Normal,
"panels": {
"Panel 1": {
"showPanelOptionButton": True,
"widgets": {
"Button 1": {
"type": "Button",
"arguments": {
"icon": QIcon("python.png"),
"text": "Button",
"tooltip": "This is a tooltip",
},
},
},
},
},
}
}
)
ribbonbar.setCurrentCategory(categories["Category 6"])
# Show the window
window.resize(1000, 250)
window.show()
sys.exit(app.exec_())
You can get a window like this:
Customize Panels
Setup Title Label
Get the title of the panel. |
|
|
Set the title of the panel. |
Add Widgets to Panels
Example
For example, using the following code,
import sys

from qtpy import QtGui
from qtpy.QtCore import Qt
from qtpy.QtGui import QIcon
from qtpy.QtWidgets import QApplication, QLabel, QLineEdit, QMenu, QToolButton

from pyqtribbon import RibbonBar
from pyqtribbon.screenshotwindow import RibbonScreenShotWindow

if __name__ == "__main__":
    app = QApplication(sys.argv)
    app.setFont(QtGui.QFont("Times New Roman", 8))
    window = RibbonScreenShotWindow("panel.png")

    # Ribbon bar
    ribbonbar = RibbonBar()
    window.setMenuBar(ribbonbar)

    category1 = ribbonbar.addCategory("Category 1")
    panel = category1.addPanel("Panel 1", showPanelOptionButton=False)
    panel.addSmallButton("Button 1", icon=QIcon("python.png"))
    panel.addSmallButton("Button 2", icon=QIcon("python.png"))
    panel.addSmallButton("Button 3", icon=QIcon("python.png"))
    panel.addMediumToggleButton("Show/Hide Category 2", icon=QIcon("python.png"))
    panel.addVerticalSeparator()
    panel.addMediumToggleButton("Show/Hide Category 3", icon=QIcon("python.png"))
    panel.addMediumToggleButton("Show/Hide Category 4/5", icon=QIcon("python.png"), colSpan=2, alignment=Qt.AlignLeft)
    panel.addLargeButton("Button 4", icon=QIcon("python.png"))
    panel.addVerticalSeparator()
    panel.addMediumButton("Button 5", icon=QIcon("python.png"))
    panel.addMediumButton("Button 6", icon=QIcon("python.png"))

    button = panel.addLargeButton("Button 7", icon=QIcon("python.png"))
    menu = QMenu()
    menu.addAction(QIcon("python.png"), "Action 1")
    menu.addAction(QIcon("python.png"), "Action 2")
    menu.addAction(QIcon("python.png"), "Action 3")
    button.setMenu(menu)
    button.setPopupMode(QToolButton.InstantPopup)
    panel.addWidget(button, rowSpan=6)

    gallery = panel.addGallery(minimumWidth=500, popupHideOnClick=True)
    for i in range(100):
        gallery.addToggleButton(f"item {i+1}", QIcon("python.png"))
    popupMenu = gallery.popupMenu()
    submenu = popupMenu.addMenu(QIcon("python.png"), "Submenu")
    submenu.addAction(QIcon("python.png"), "Action 4")
    popupMenu.addAction(QIcon("python.png"), "Action 1")
    popupMenu.addAction(QIcon("python.png"), "Action 2")
    popupMenu.addSeparator()
    popupMenu.addWidget(QLabel("This is a custom widget"))
    formLayout = popupMenu.addFormLayoutWidget()
    formLayout.addRow(QLabel("Row 1"), QLineEdit())

    # Show the window
    window.resize(1300, 250)
    window.show()

    sys.exit(app.exec_())
You can get a window like this:

A Complete Example
The following code snippet is a complete example.
import sys

from PyQt5.QtCore import Qt
from PyQt5.QtGui import QFont, QIcon
from PyQt5.QtWidgets import QApplication, QLabel, QVBoxLayout, QWidget

from pyqtribbon import RibbonBar
from pyqtribbon.screenshotwindow import RibbonScreenShotWindow
from pyqtribbon.utils import DataFile

if __name__ == "__main__":
    app = QApplication(sys.argv)
    app.setFont(QFont("Times New Roman", 8))

    # Central widget
    window = RibbonScreenShotWindow("tutorial-ribbonbar.png")
    window.setWindowIcon(QIcon(DataFile("icons/python.png")))
    centralWidget = QWidget()
    window.setCentralWidget(centralWidget)
    layout = QVBoxLayout(centralWidget)

    # Ribbon bar
    ribbonbar = RibbonBar()
    window.setMenuBar(ribbonbar)
    category = ribbonbar.addCategory("Category 1")
    panel = category.addPanel("Panel 1")
    panel.addLargeButton("A Large Button", QIcon(DataFile("icons/python.png")))
    panel.addMediumButton("A Medium Button", QIcon(DataFile("icons/python.png")))
    panel.addMediumButton("A Medium Button", QIcon(DataFile("icons/python.png")))
    panel.addSmallButton("A Small Button", QIcon(DataFile("icons/python.png")))
    panel.addSmallButton("A Small Button", QIcon(DataFile("icons/python.png")))
    panel.addSmallButton("A Small Button", QIcon(DataFile("icons/python.png")))

    # Display a label in the main window
    label = QLabel("Ribbon Test Window")
    label.setFont(QFont("Arial", 20))
    label.setAlignment(Qt.AlignCenter)

    # Add the ribbon bar and label to the layout
    layout.addWidget(label, 1)

    # Show the window
    window.resize(1800, 350)  # type: ignore
    window.show()
    sys.exit(app.exec_())
You can get a window like this:
